Learning to brace (PART II)

Looking at shoulder health from a wider perspective
August 15, 2019
Lymphedema and Breast Cancer
August 25, 2019
This article contains the progression exercises for “learning to brace” article.
Abdominal wall training is a key to preventing recurrent lower back pain and enhancing athletic performance. Traditional exercises such as sit-ups have been replaced with safer alternatives such as the dying bug. The emphasis is on spine stability, form, endurance, and proper breathing. To borrow a page from Pilates, the quality of the movement (e.g. coordination) is more important than the quantity (sets/repetitions/weight). For each exercise perform 8–12 slow repetitions on each side, making sure that the form is strictly held. Should you not be able to achieve 12 repetitions with good controlled form, it is advisable for you not to continue to 12, and progress with control to being able to perform 12. This type of training should be performed twice a day.
Once the basics of abdominal bracing and dying bug exercises are mastered curl-ups, side bridges, advanced dying bugs, and abdominal bracing in functional positions such as the squat are recommended. For each exercise perform 8–12 slow repetitions. This type of training should be performed twice a day.
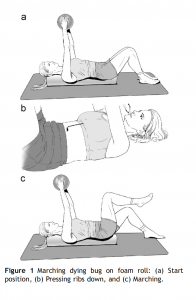 1. Marching dying bug on foam roll
Begin with your arms stretching upwards to the ceiling holding a medicine ball (Figure 1a). Keep your lower front ribs pressed down while breathing normally (Figure 1b). March by raising one foot at a time (Figure 1c). Note that no movement should occur in the trunk. This teaches you control and stability in rotation.
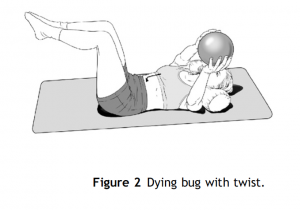
Assume the basic dying bug position with a medium size medicine ball in your hands. Move your arms and legs in opposite directions while keeping your core braced and breathing normally (Figure 2).
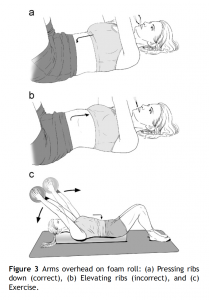
With your feet on the ground hold a medium size medicine ball in your hands. Keep your lower front ribs pressed down (isometric crunch position) while breathing normally, then let it go (Figures 3a,b). Now, hold the isometric crunch and slowly raise your arms overhead. Test that you are holding the crunch by letting it go and feeling if your back comes off the ground and ribs move up. Be sure you keep the crunch—back flat and ribs down—while moving your arms back and forth (Figure 3c).
4. Bicycle kicks on a foam roll
Lie on your back on the foam roll. Bring your feet up in the air so that your shins are horizontal and your thighs vertical (90/90 position). Place both hands on the ground. Tighten your ‘‘core’’ by pushing your ribs down without flattening your lower back or holding your breath. Alternately kick your legs out like you are riding a bicycle (Figure 4). 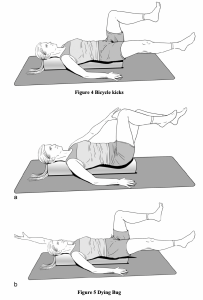
5. Dying bug on a foam roll
Lie on your back on the foam roll. Bring your feet up in the air so that your shins are horizontal and your thighs vertical (90/90 position). Reach to the ceiling with one hand as high as you can while your other hand stays on the ground for support and balance. Tighten your ‘‘core’’ by pushing your ribs down without flattening your lower back or holding your breath. Tap a knee with the opposite hand (Figure 5a). Then extend your arm and leg on opposite sides (Figure 5b). Progress by adding a small medicine ball in your hand.
6. Wall slide squat
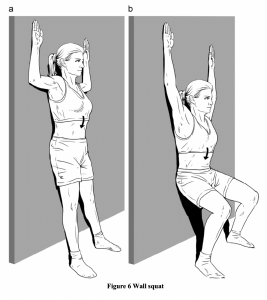
Let’s transfer what you have learned on the floor and foam roll to an upright more functional activity such as squatting. Stand with your back against a wall. Raise your arms overhead bending them at the elbow so that the back of your hands touch the wall. At the very least the thumb side of your hand should be on the wall. Move your feet a few inches forward of the wall and be sure the back of your head touches the wall as well. You should notice that your back arches somewhat. Tighten your ‘‘core’’ by pushing your ribs down without flattening your lower back or holding your breath (Figure 6a). Hold this abdominal brace and slide down the wall with your torso, but leaving your arms fixed. Your elbows should straighten (Figure 6b). Try to keep your back flat and ribs down in front while you slide up and down the wall.
Alex Z.
[ad_2]
Source link


